No products in the cart.


Rack Patching: Layer Patches Across An Ableton Drum Rack
Drum Rack Patching In Ableton Live
Here’s how you set up Rack Patching in a soundpack or any type of Drum Rack:
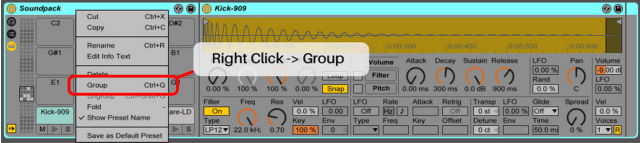
1. Group the Drum Rack that you’re building your soundpack with into an Instrument Rack (right-click then group, or CTRL/CMD + G).
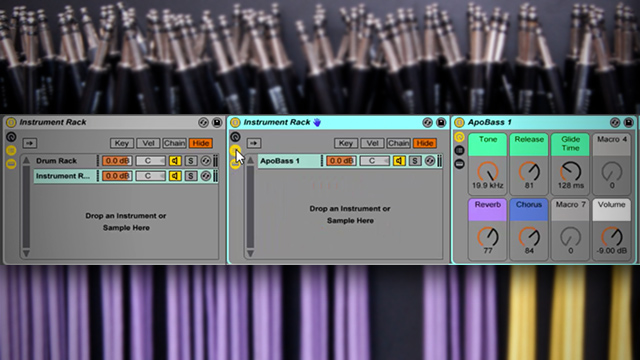
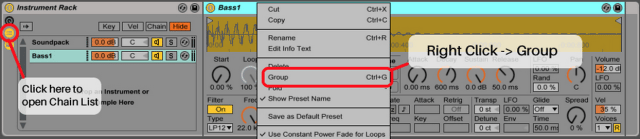
2. Drop sample/patch/instrument-rack below Drum Rack in chain-list of the newly made Instrument Rack. Use CTRL/CMD + G again to group this into an Instrument Rack if it isn’t already one. Rename this to ‘Container’. This patch can be for nearly anything: bass, pads, melody, or even an 808-style kick. Get creative here!
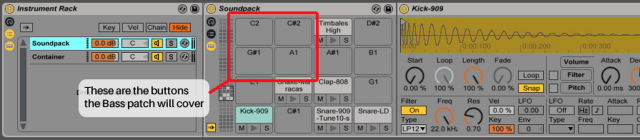
3. Determine what notes you want to trigger your sample with by checking the slots on the Drum Rack. In this case, I’m wanting to trigger 4 different tones of a bass patch I’ve sampled from the Korg Volca Bass and Keys, and these will be on G#1, A1, C2, and C#2. Keep in mind these are not necessarily the notes that you will hear when you press the buttons, these are only the buttons you want the patch to cover.
4. We can use Ableton’s Scale MIDI plugin to act as a ‘Button Chooser’. Drop a Scale in front of your Instrument Rack Patch. Right click it and Rename it ‘Button Chooser’. Unselect any notes that you do NOT want triggering your patch. I’m going to leave G#, A, C, and C# checked.
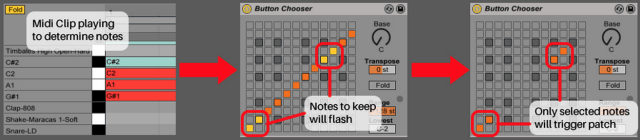
Tip: Make a temporary MIDI clip with a ‘chord’ of the notes that you want to use and hit play; they will flash in the ‘Button Choose’ and it will be easier to see what to unselect.
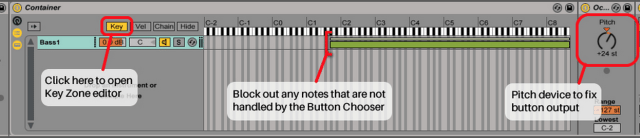
5. Drop a Pitch device inside the Instrument Rack but in front of your patch. I’ve bumped the pitch that the patch will play up by +24 semitones so that the notes will trigger within the C3 octave just like the cells in a drum rack do. Label this one ‘Octave Fixer’.
6. Let’s open up the Key Zone editor of our Container and use it to ‘block’ any extra incoming MIDI notes outside of the desired octave (such as C2/C#2 in this example).
7. Finally, put another Scale directly after your Octave Fixer and rename it to ‘Transposer’. This scale plugin will let you determine which notes each button will actually play. Copy the same buttons from your Button Chooser, then move them up or down in the columns accordingly to make them play the notes you want to hear.
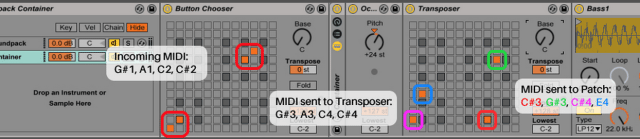
Tip: Use the other features of scale to adjust the range of what notes will be sent. The MIDI clip from earlier will help you line up the notes as the columns may change with the Root note. Also try the Transpose and Fold functions!
Test Your Ableton Rack Patch!
Now when I play the buttons on the soundpack, the patch that is layered below the drum-rack is also triggered, but only on the appropriate buttons. You actually can still layer other things IN the drum rack cells if you like, and turn those on and off via a knob, or with CC mappings and vice-versa.
You can also set any other macro mappings you would like to adjust on the fly for more control during your performance. In this example I’ve mapped the Decay/Release of the bass patch, as well as the Glide time.
Original post found here
:http://djtechtools.com/2015/10/18/rack-patching-layer-patches-across-an-ableton-drum-rack/
P.S. To get the best premium quality producer kits, drum loops, and samples, visit and subscribe to SoundOracle.net
Leave a comment
About Us
- info@soundoracle.net