-
If you have both a vocal and instrumental version of a track, a little phase cancellation can go a long way

SAMPLING WEEK: The simplest way to create a DIY acapella requires you to have both the full vocal and instrumental versions in your possession. The theory is that the only difference between these versions will be the vocal. Therefore, inverting the polarity of one of the tracks' waveforms will cause everything apart from the vocal to disappear thanks to the magic of destructive interference.
Unfortunately, there will often be subtle differences between the vocal and instrumental versions, and they may have received different treatment at the mixing, mastering and encoding stages, further complicating matters.
The proof is in the pudding, so let's give it a whirl. Here, we'll create a DIY acapella with vocal and instrumental versions of Cassie's 2006 R 'n' B banger Me & U, but you can use any song you like - the process is exactly the same.

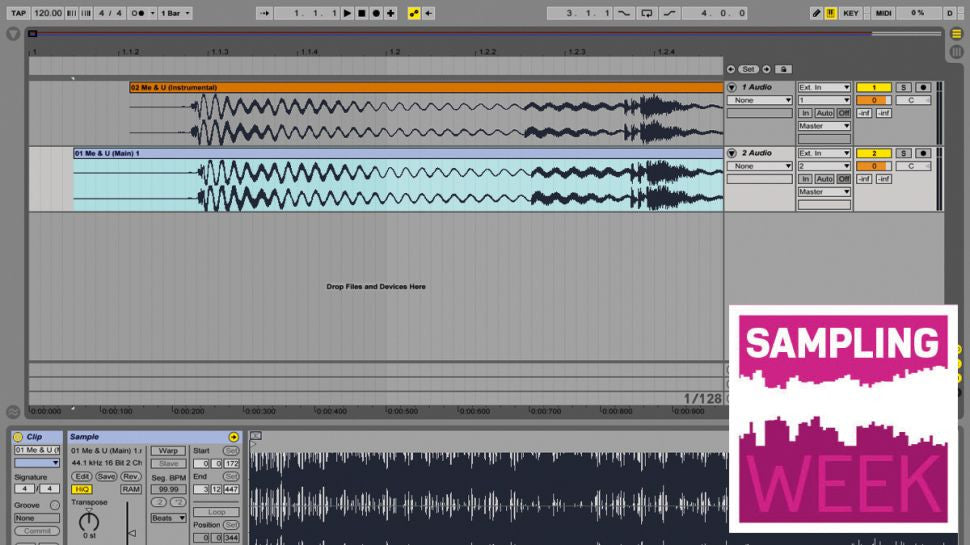
Step 1: Drag your vocal and instrumental versions onto separate audio tracks in Live. Ensure that both clips' Warp modes are deactivated by clicking the clips and inspecting the Clip View panel. When they're both unwarped, ensure their start points are roughly aligned.

Step 2: Turn snap to grid off (press Ctrl/Cmd+4), then zoom in to the start of the waveforms by dragging down on the Beat Time Ruler. Keep aligning and zooming until you've zoomed in as far as you can. Before you play the tracks back, turn them both down to -6dB.

Step 3: If you've correctly aligned the track, you should hear it sound normal, albeit with a vocal that's been reduced in volume by half. Put a Utility plugin from the Audio Effects folder on either track and activate its Phz-L and Phz-R buttons to invert the signal's polarity.
For more on remixing, grab Future Music 298, which is on sale now.
Original article found here:
http://www.musicradar.com/tuition/tech/how-to-create-diy-acapellas-in-ableton-live-631118


